Thursday, April 5, 2018

Overview of access teams and demonstration.

Brief Description :
Access teams provide a way to share records between different functional teams without having to change or update the base security rule in Security roles. Access teams does not mean ownership of the record. The record is only shared so that other users can work on it.

Scenario:

There are two sales teams “Sales India” and “Sales Us” in different business units.The users of both the teams can read the whole organizations data but can write/edit data to only those user’s data who are in the same business unit.Here if one team member of “Sales US” wants to write/edit a record of “Sales India” it is not possible. This is where access teams comes in the picture. Some users from “Sales US” can be given access to write/edit records of “Sales India”

Steps:

Step 1:
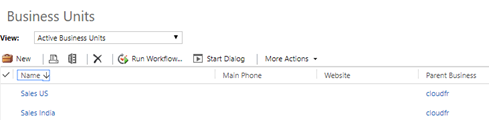
There are two business units “Sales India”  and “Sales US”
Step 2:
Tom is a part of “Sales India Team” and Harry is a part of  “Sales US Team”.
Step 3:
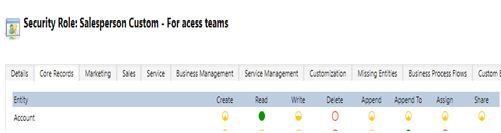
Assigned both the users a custom role in which they can do the following as shown below
  1. Read account records of the whole organization,
  2. Create records at user level
  3. Write/edit records at business unit level
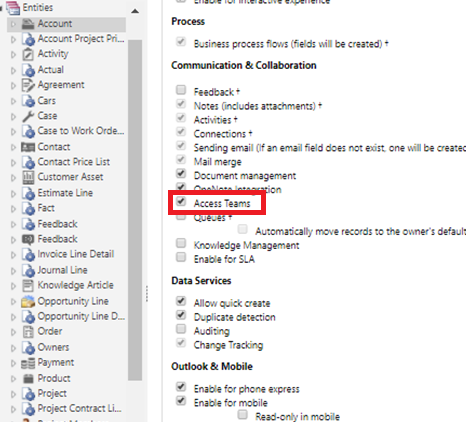
Step 4:
Now to enable access team we must navigate to entity for which access teams needs to be enabled as shown in figure below
Here we go to Accounts entity and enable Access Teams then to save the changes made publish all the customization.
Step 5:
To use access teams we first create an access team template by navigating to Setting > Security > Access Team Templates
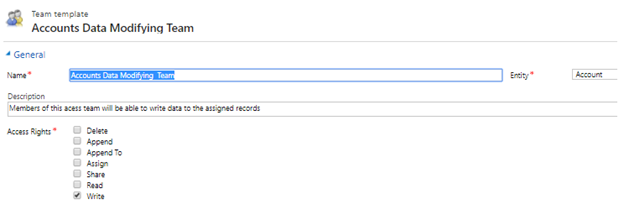
Step 6:
Here create a new template with an appropriate name and select the Access Rights and the Entity as shown in the figure below.
Note:The entities field on which Acess Teams are enabled only those entities will be shown in the Entity field dropdown.
By adding users, you are granting them the access rights to that record that are defined within the access team template, even if their base security role does NOT grant them those rights. Note, the access rights are ONLY being granted for that specific record.
Step 7:
Now we add a Sub grid on the Accounts main form so that the users can be added to the access team on the fly.
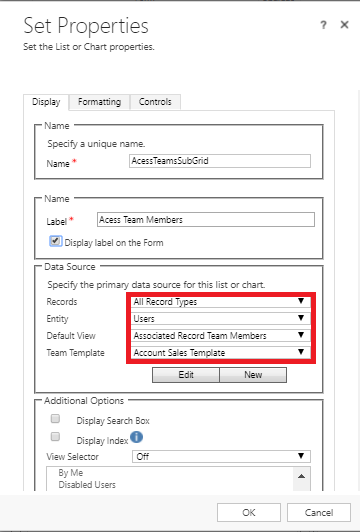
Here in the Team Template field select the template made for the access team. After setting up the subgrid Save and Publish all the Customizations.
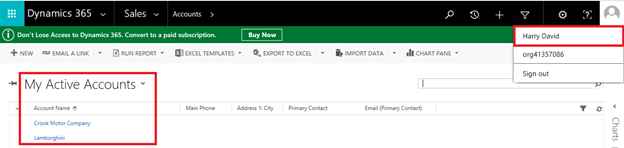
Step 8:
Harry is the owner of two records(Crook Motor Company & Lamborghini) as shown below.
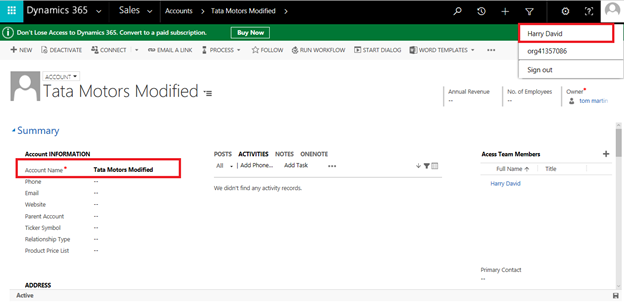
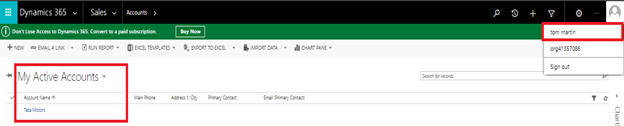
Tom is the owner of one record(Tata Motors) as shown below
Step 9:
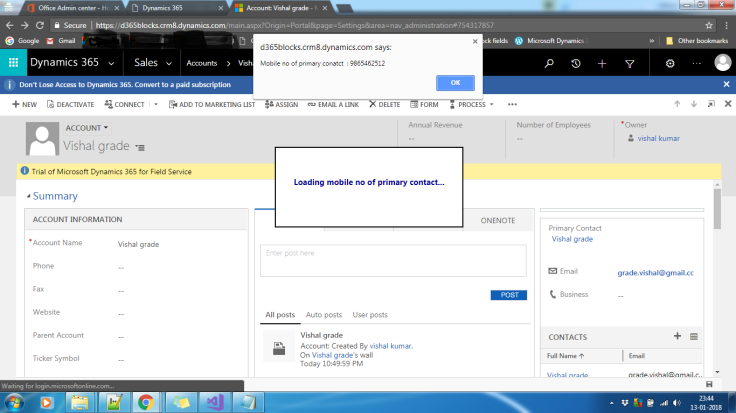
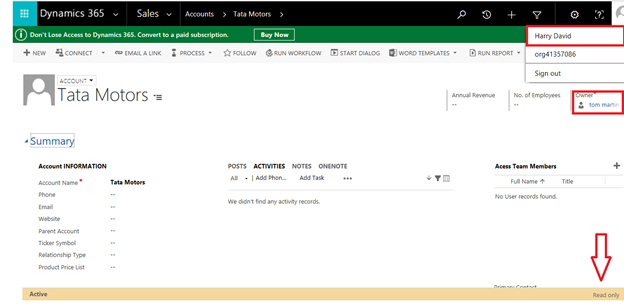
Harry can view every record in the organization but cannot write/edit. As seen below harry can only read record created by Tom.
Step 10:
Now as harry wants to write/edit this particular record, the admin has to add him in the access team sub-grid to give him access to write to this record.
Step 11:
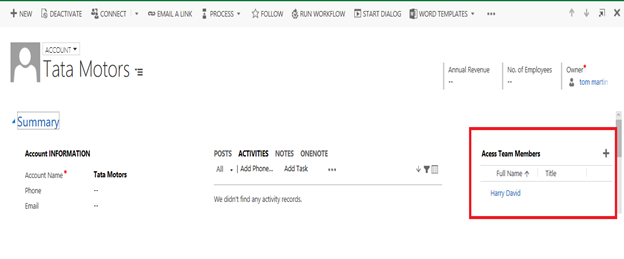
Now Harry can write/edit to that particular record as shown below.

Wednesday, February 14, 2018

Client API execution context

We can pass the execution context in the following way.

Defining event handlers using UI: The execution context is an optional parameter that can be passed to a JavaScript library function through an event handler. Use the Pass execution context as first parameter option in the Handler Properties dialog while specify the name of the function to pass the event execution context. The execution context is the first parameter passed to a function.


The Client API form context (formContext) provides a reference to the form or to an item on the form, such as, a quick view control or a row in an editable grid, against which the current code is executed.
Earlier, the global Xrm.Page object was used to represent a form or an item on the form. With Dynamics 365 (online), version 9.0, the Xrm.Page object is deprecated, and for you should use the getFormContext method of the passed in execution context object to return reference to the appropriate form or an item on the form.

Utilizing the formContext object rather than the Xrm.Page object

Please find the below sample code for example

Using Xrm.object
Function contactDetails()
{
         var fName = Xrm.Page.getAttribute("firstname").getValue();
    var lName = Xrm.Page.getAttribute("lastname").getValue();
}

Using formContext
function contactDetails(executionContext)
{
    var formContext = executionContext.getFormContext(); //to get the formContext

    // use formContext instead of Xrm.Page 
    var fName = formContext.getAttribute("firstname").getValue();
    var lName = formContext.getAttribute("lastname").getValue();
   
}

Wednesday, January 17, 2018

Microsoft Dynamics 365 v9.0 latest feature – Show Progress Indicator

In latest release of Dynamics 365 i.e. v9.0 MS has introduces many new features to enhance the user experience, Progress indicator is one of them.
Many times we need to write client side javascript code which take some time to execute due to many reasons (further server side code running etc). In such case, in earlier version user were not able to know that if anything is happening in background and  user needed to wait for next response from crm system.
Now in this release, MS has introduced progress indicator which is can be called as showProgressIndicator function of Xrm.Utility. namespace.
It’s take a text string as parameter to display on the progress indicator.
We have created an example test case of it’s use in which can be utilize in more relevant cases like while calling any function from ribbon button etc to show message to user.
Here we are loading the mobile no of primary contact of an account and showing it in an alert message and during the period we want user to be informed that system is loading it:

function getPrimaryContactMobile()
{
 Xrm.Utility.showProgressIndicator("Loading mobile no of primary contact..");
 setTimeout(delayedLoadPrimaryContactDetails, 3000);
}

function delayedLoadPrimaryContactDetails()
{
 var contact = Xrm.Page.getAttribute("primarycontactid").getValuentact == null){
 Xrm.Utility.closeProgressIndicator();
 return;
 }
 Xrm.WebApi.retrieveRecord("contact", contact[0].id, "$select=mobilephone")
 .then(function(result) {
 var mobileno = result["mobilephone"];
 Xrm.Utility.closeProgressIndicator(); //To close the progress indicator
 alert("Mobile no of primary conatct  : " + mobileno);
 })
 .fail(function(error) {
 Xrm.Utility.closeProgressIndicator();
 var message = error.message;
 alert("Error: "+message);
 });

1

I’m sure it can be useful in more complex scenarios.
Hope it would be helpful.

Thursday, January 11, 2018

CRUD Operation using Xrm.WebAPI In Dynamics 365-CRM

With Microsoft releasing Dynamics 365 update 9.0, now, we have a new library to implement WebAPI methods using Xrm.WebApi. Instead of writing the complete request, now we can just use direct the CRUD methods from the Web API.


Xrm.WebApi has two properties to use for the Online and the Offline client respectively. In this article, we are going to implement a sample HTML web resource using Xrm.WebApi for the online client.

Now, to create an entity record, we can simply call Xrm.WebApi Create method using the following parameters.


    <script>


        function createAccount() {

            // collect account data

            var data = {

                "name": document.getElementById("txtname").value,

                "address1_city": document.getElementById("txtcity").value,

                "telephone1": document.getElementById("txtphone").value,

                "numberofemployees": document.getElementById("txttotalemployees").value,

                "websiteurl": document.getElementById("txtwebsite").value


            }

            // create account record

            parent.Xrm.WebApi.createRecord("account", data).then(

                function success(result) {

                    document.getElementById("txtaccountid").value = result.id;

                    alert("Account Created !!");

                },

                function (error) {

                    alert(error.message);

                }

            );

        }

        function updateAccount() {

            // collect account data

            var data = {

                "name": document.getElementById("txtname").value,

                "address1_city": document.getElementById("txtcity").value,

                "telephone1": document.getElementById("txtphone").value,

                "numberofemployees": document.getElementById("txttotalemployees").value,

                "websiteurl": document.getElementById("txtwebsite").value


            }

            //get account id

            var accountId = document.getElementById("txtaccountid").value;


            // update account record

            parent.Xrm.WebApi.updateRecord("account", accountId, data).then(

                function success(result) {

                    alert("Account Record Updated");


                },

                function (error) {

                    alert(error.message);


                }

            );


        }

        function deleteAccount() {

            var accountId = document.getElementById("txtaccountid").value;

            parent.Xrm.WebApi.deleteRecord("account", accountId).then(

                function success(result) {

                    alert("Account deleted");


                },

                function (error) {

                    alert(error.message);


                }

            );

        }

    </script>

</head>

<body>

    <table>

        <tbody>

            <tr><td>Account ID</td><td><input id="txtaccountid" type="text" readonly=""></td></tr>

            <tr>

                <td>Account Name</td>

                <td><input id="txtname" type="text"></td>

            </tr>

            <tr><td>Main Phone</td><td><input id="txtphone" type="text"></td></tr>

            <tr><td>City</td><td> <input id="txtcity" type="text"></td></tr>

            <tr><td>Website</td><td><input id="txtwebsite" type="text"></td></tr>

            <tr><td>Total Employees</td><td><input id="txttotalemployees" type="text"></td></tr>


            <tr><td colspan="2"><input onclick="createAccount()" type="button" value="Add New">
<input onclick="deleteAccount()" type="button" value="Delete">
<input onclick="updateAccount()" type="button" value="Update"></td></tr>

        </tbody>

    </table>


</body>

</html>

Wednesday, December 27, 2017

How to use Angular JS in MS Dynamic CRM 365.

Step 1: Download the angular js lib. from Here.


Step 2: Upload this lib. in CRM as a Web resource like this:
Step 2: Create HTML file and Write the angular js code in it. Here i write very simple code.


Step 3: Create HTML Web Resource in your Dynamic CRM and Upload the file that you have created in the last step, as show in below Image.


Step 4: Now apply this Web Resource on any Entity form. Here i applied this on Account Entity.

Step 5: Now reload the page and see the page on which web resource is applied.

Tuesday, December 26, 2017

Deployment of CRM Portal from one CRM Environment to another Environment

Deployment of CRM Portal from one CRM Environment to another has always been a challenging task for everyone. As I have seen many folks were facing many challenges during CRM Portal deployment and finding for best way to migrate CRM Portal Configuration from Development to Test and Test to Production Environment.

CRM Portal provides two ways for Deployment mentioned below :

Website Copy Tool - I was like WAOOO...when i got to know about this tool and i have started using it first time to migrate my CRM Portal Configuration from Development Organisation to UAT , but it disappoint me when i found that this tool has so much limitations like :

• It does not migrate your Subgrid Entity Forms, so you have to manually recreate it on destination organisation which is very annoying and time consuming.

• Along with Subgrid Entity forms, some other configuration you have to create manually like sometimes it does not map correct values in lookup in Entity Forms and Entity List.

• Incremental Deployment is not possible through this tool. Because it does not migrate data based on GUID, Each time when you run this tool either you will need to delete all configuration that you had migrated earlier or need to create new Portal/Websites to keep the Old configuration copy as it. is. otherwise It will create the duplicate records in destination organisation..

ALM Toolkit -  Although CRM Portal Community recommends to go with this tool for CRM Portal Deployment But for me this tool is damn complex and confusing also its very tough to use, Basically this tool is made for Power Shell Expert guys. So here i will not going to use this tool.

Also this was not free tool till few days back but not sure now whether its available for free use or not. Although i am still learning it how much it is feasible to fulfill my requirement, i will get back once i will have the proper understanding of this tool.

So now the question is what approach or tool we should use for CRM Portal Deployment:

Configuration Migration Tool:

Before going to explain this approach i am assuming that you all guys will be having knowledge of Configuration Migration Tool available in CRM SDK, if not please have a look below link first and then do deployment

https://technet.microsoft.com/en-in/library/dn647422.aspx


Configuration Migration Tool (DataMigrationUtility) is one of best tool available in CRM SDK to migrate CRM Portal Configuration from one Environment to another without any limitation.

This tool works great not only if you are planning for only one time deployment but also for Incremental deployment.

This tool exports CRM data by a given schema  to a zip package. The package could be kept as back up or imported to other CRM instances. PackageDeployer tool from sdk “Tools” folder is  a deployment option as well and gives you a chance to deploy solution and portal together. All you need to use the tool is create an export schema once and update by new needs. 

The beauty of this tool is keeping the same ids (guides) across different environments. so it nullify the chance of duplication.

Steps to Deploy CRM Portal Configuration using Configuration Migration Tool :

Create Schema File for CRM Portal :

This is only one time activity, once you will have your Schema File, you will not be required to create it again unless you need to add some other entities.

1.Run the Configuration Migration Tool (You can find this tool in CRM SDK at location \SDK\Tools\ConfigurationMigration\DataMigrationUtility.exe\
2.Choose Create Schema Option from Opened Window and Continue
3.Enter your Organisation's credential and Click Login, Make sure you have selected "Organisation List" Checkbox if you are having multiple organisation setup on same server.
4.After Successfully Log In -  Select ADX Solutions one by one from Solutions Drop-down and add all CRM Portal Entities and its all respective Fields.
5.Make sure you are selecting only CRM Portal Solutions from DropDown and creating Schema File of only CRM Portal related entities (All entities having prefix adx_).
6.Along with CRM Portal Entities, Don't forget to add Note entity because ADX also use CRM's Note entity to attach your webfile attachments (images, CSS etc)
7.Once you are done with Schema File Creation. Save and Export this File and save at your machine.

Export CRM Portal Configuration From Source Organisation :

Once you have your Schema File, You are ready to Export your CRM Portal Data from Source Organisation.

1.Run the Configuration Migration Tool (You can find this tool in CRM SDK at location \SDK\Tools\ConfigurationMigration\DataMigrationUtility.exe\
2.Choose Export Data Option from Opened Window and Continue
3.Enter your Organisation's credential and Click Login, Make sure you have selected "Organisation List" Checkbox if you are having multiple organisation setup on same server.
4.Select the Schema File that you have created earlier in first Lookup
5.Select your Desktop location where you want to keep the exported data file of source CRM Portal Configuration.
6.Continue to Start Exporting the Data


Import CRM Portal Configuration to Destination Organisation :

Once you have your Data.zip file, You are ready to Import your CRM Portal Data in Destination Organisation.

1.Run the Configuration Migration Tool (You can find this tool in CRM SDK at location \SDK\Tools\ConfigurationMigration\DataMigrationUtility.exe\
2.Choose Import Data Option from Opened Window and Continue
3.Enter your Organisation's credential and Click Login, Make sure you have selected "Organisation List" Checkbox if you are having multiple organisation setup on same server.
4.Select the Data.zip File that you have exported earlier.
5.Continue to Start Importing the Data in destination organisation

x

Tuesday, December 19, 2017

CRM Field Editing Ninja

If you need to change some of the field’s behavior such as:
  • Required level
  • Enable/Disable Auditing
  • Flagging the fields to be Searchable or not

Rather than opening the fields 1-by-1 to make the change, there is a shortcut to apply the same settings to more than 1 fields:
CRM_Field_Editing_Ninja
Select the list of fields that require the similar settings, click the Edit action to open the “Edit Multiple Fields” window to apply the changes to these fields

Get files of last hour in Azure Data Factory

  Case I have a Data Factory pipeline that should run each hour and collect all new files added to the data lake since the last run. What is...