Friday, August 11, 2017

Microsoft Flow – Create record in Dynamics 365

Recently we received a requirement to integrate a mailbox not configured in CRM and external to CRM with Dynamics 365.

The client had an enquiry mailbox, and they did not want the emails to be created in CRM, and therefore it was not configured. However, they did want that the lead should be automatically created for all enquiries received. That is where Microsoft Flow came to the rescue. Using Flow, it is possible to design process flows to automate integrations with external systems.
Here we discuss the steps to create a lead in Dynamics CRM for every email received on a Gmail id.

Steps to create the flow:

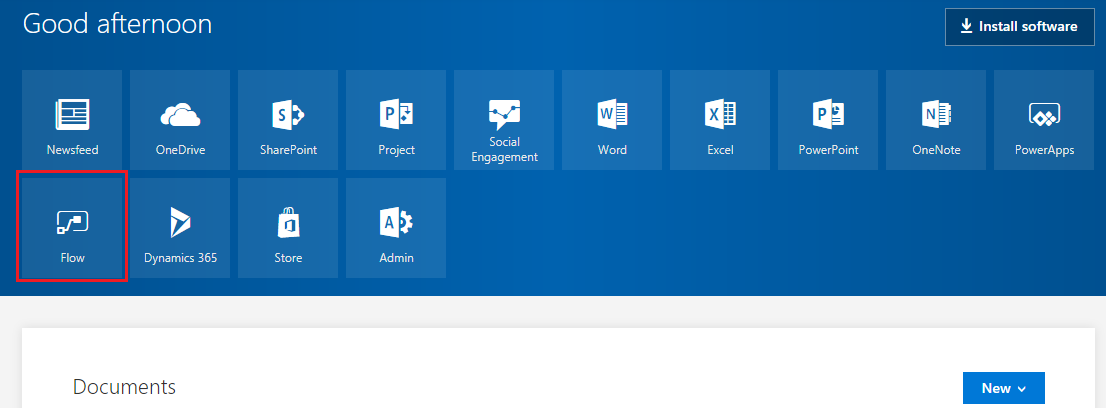
1. Go to https://portal.office.com and click the Flow as shown in the screenshot below;
Create record in Dynamics CRM
2. Click on ‘Create from Blank’ button as shown in the screenshot below;
Create record in Dynamics CRM3. Select ‘Gmail – When a new email arrives’, it will then ask you for the Gmail credentials, enter the appropriate credentials.
Create record in Dynamics CRM4. Now select ‘Inbox’ as seen in the screenshot below;
Create record in Dynamics CRM
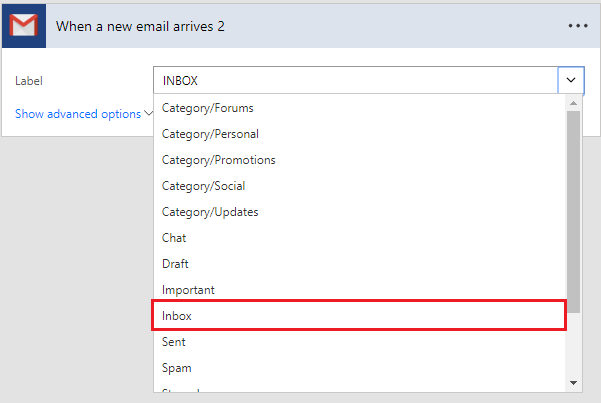
5. Next, click on ‘New step’ button and select ‘Add an action’ as seen in the screenshot below;
Create record in Dynamics CRM
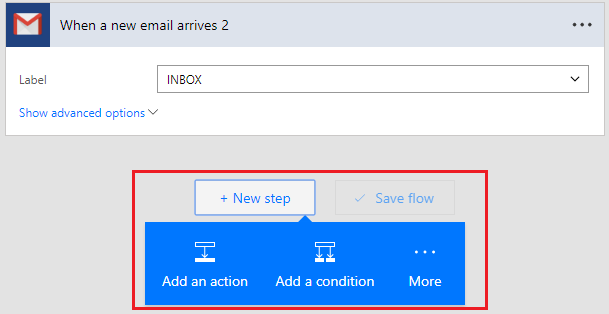
6. Then select ‘Dynamics 365 – Create a new record’ as seen in the screenshot below;
Create record in Dynamics CRM
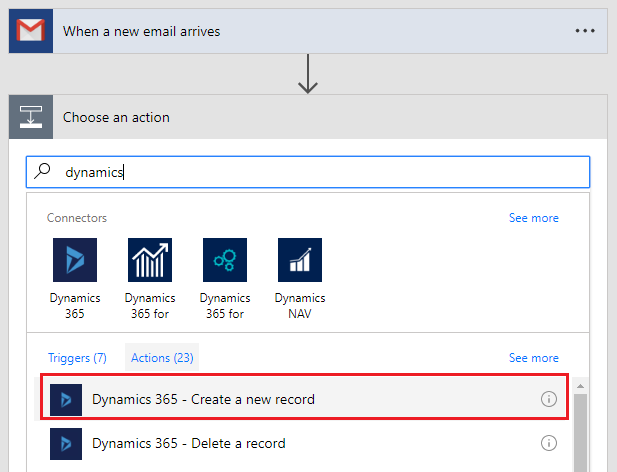
7. Selecting the above option allows us to enter the Organization Name, Entity name of the records we need to create in Dynamics 365 when an email is received, and we can also specify the field mapping as shown below. Once the mapping is done, click on ‘Create Flow’.
Create record in Dynamics CRM
The lead will be created in CRM with this mapped data, and the body of the email is copied to lead notes.
8. Then click on ‘Done’, and the flow is now ready to use.
9. Now whenever we receive an email on Gmail, the lead will be created in CRM. Also, we can see the status in ‘My flows’  list as shown in the screenshot below;
Create record in Dynamics CRM

Conclusion:

Using Microsoft Flow, users can easily create and automate workflows across multiple applications, in this case, Gmail & Dynamics 365. Once a flow is configured, it can be managed on desktop or mobile device and gives users an unprecedented ability to automate.

Saturday, August 5, 2017

Field Validation Editable Grids

Scenario

Say I want to get the value of an editable grid cell on change and add some validation on it.
I have a field called ‘Contact Code’ and I want to be notified if I enter a value that is less than 4 characters.
field-validation-editable-grids
We need a way to reference the current field that was entered and validate its value.

getFormContext Method (Introduced in Dynamics 365)

The key is to pass the context object a parameter to the OnChange grid event and then use the getFormContext method to return the reference of the grid.
The handy thing about this is that it can return a reference to either a Form or Grid control depending on where it was called.
function EditableGridFieldValidation(executionContext) {

    var gridObject = executionContext.getFormContext().data.entity;
    var contactCodeValue = gridObject.attributes.getByName('new_contactcode').getValue();
    var contactCodeField = gridObject.attributes.getByName('new_contactcode').controls.getByIndex(0);

    if (contactCodeValue.length < 4) {

        contactCodeField.setNotification('Contact code cannot be less than 4 characters', 'ValidationAlert');
    }
    else {

        contactCodeField.clearNotification('ValidationAlert');
    }
}
Once you have created your code, you can upload your grid control (either on form, subgrid or homepage) by navigating to the Events tab.
Upload your script under Form Libraries like you normally do.
field-validation-editable-grids-3

Under Event Handlers, specify your Entity, Field and select ‘OnChange’ for the Event.
Effectively, you are going to call a function for the OnChange event that performs the field validation.
Click on Add to add your Jscript library and enter the name of the Function.
field-validation-editable-grids-4
Click on ‘Pass execution context as first parameter’ and hit OK. This will pass the executionContext object to the function.
field-validation-editable-grids-5

Publish your changes and you will see it in action !
So there it is, you can do basic string validation for editable grids using the new getFormContext method

Friday, August 4, 2017

Show Hide Sections in Dynamics CRM

/************************************************
stateSectionsOnChange - function to handle which fields
to show based on the state selected
************************************************/
function stateSectionsOnChange() {
    var closeTab = Xrm.Page.ui.tabs.get("Professional Info");
var showTXSection = false;
    var showOHSection = false;
    var showINSection = false;

    switch (Xrm.Page.getAttribute("col_addressstate").getText()) {
        case "Texas":
showTXSection = true;
            showOHSection = false;
showINSection = false;
            break;
        case "Ohio":
showTXSection = false;
            showOHSection = true;
showINSection = false;
            break;
        case "Indiana":
showTXSection = false;
            showOHSection = false;
showINSection = true;
            break;
    }

    closeTab.sections.get("Texas").setVisible(showTXSection);
    closeTab.sections.get("Ohio").setVisible(showOHSection);
    closeTab.sections.get("Indiana").setVisible(showINSection);
}
/***    end stateSectionsOnChange     ***/

Tuesday, August 1, 2017

Configure View Columns for Global Search

Recently, I was asked to change the "View Columns" on CRM Global Search. Typically, there is no seperate view for Global Search. It works on Quick find view of the configured entities for Global search, where it looks for "Find Columns" to run its quick find searches. So, I started looking into Quick find view. After little bit research, I found Global Search shows first three columns of Quick Find view in the searches. So I just changed the order of the few columns, moved the requested View Columns to first three and Voila! its done. 

Convert Plugin to Sandbox mode,

While working with Dynamics CRM Plugins, the thumb rule for Plugin Registration is:
  • If you are working with CRM On-Premise, use Plugin isolation mode as None.
  • If you are working with CRM Online, use Plugin isolation mode as Sandbox.
So, now the scenario is you are working on big implementation for CRM On Premise. Now your organization decides to move to CRM Online. The first task comes to mind is to move all the Plugins to Sandbox mode and see if they are still working considering running Plugin in sandbox comes with some limitations (such as you cannot access file system/registries/external assemblies/protocols/IP Addresses etc).

To convert the Plugin assemblies to Sandbox mode, one option is to open Plugin Registration tool and convert the assemblies one by one which is a tedious task. The other simple option is do this by Customization.xml file. Below are the steps how to do that.
  1. Create a solution with all Plugin assemblies or use existing solution if already available.
  2. Export the solution.
  3. Unzip the solution and extract all the files.
  4. Open Customization.xml file with notepad/Xml editor/Visual Studio.
  5. Look for IsolationMode tag.
  6. Update the IsolationMode property to for all the PluginsBasically the xml should look like below:<IsolationMode>2</IsolationMode>
  7. Save the Customization.xml file.
  8. Zip all the files back and import to CRM.
This way you can quickly sandbox your plugin or in other terms all the plugin would be converted/upgraded to Sandbox mode.       

Data Import Security Role for Dynamics CRM

Recently, someone asked on one of the community forum that what all privileges should be given to allow Data Import to Dynamics CRM. I responded but thought that it would be helpful if I write in one of the blog so that it benefits others as well.
If we think of import process to CRM, it works as below:
  1. Source file gets uploaded.
  2. It will prompt for data mapping.
  3. Data Map record gets created and you can start seeing the status for the file being imported under Settings-->Import.
  4. Data gets imported and records created.
So broadly if someone want to import the records, he definitely should have Create, Read and Write permission on the entity, he wants to import. Along with that he should have privileges on following entities:
 Entity Security Role Tab Privilege
 Import Source File Core RecordsUser Level  Create, Read, Write, Delete, Append, Append To
 Data Import Core Records User Level  Create, Read, Write, Delete, Append, Append To
 Data Map Core Records User Level  Create, Read, Write, Delete, Append, Append To

Get files of last hour in Azure Data Factory

  Case I have a Data Factory pipeline that should run each hour and collect all new files added to the data lake since the last run. What is...